Content Menu
● Understanding SMD LEDs
>> Advantages of Using SMD LEDs
● Preparing for Installation
>> Tools Required
>> Materials Needed
● Step-by-Step Installation Process
>> 1. Inspect the PCB
>> 2. Apply Flux
>> 3. Position the LED
>> 4. Tack-Solder One Side
>> 5. Solder the Other Side
>> 6. Inspect Your Work
>> 7. Clean Up
● Troubleshooting Common Issues
>> Cold Joints
>> Misalignment
>> Overheating
● Best Practices for Working with SMD LEDs
● Advanced Techniques for Professional Results
>> Using a Hot Air Rework Station
>> Preheating Your PCB
>> Using Automated Equipment
● Conclusion
● Related Questions
>> 1. What Are Common Applications for SMD LEDs?
>> 2. How Do You Choose Between Different Types of SMD LEDs?
>> 3. What Is The Importance Of Polarity When Installing SMD LEDs?
>> 4. Can I Use Regular Leaded Solder For SMD Applications?
>> 5. How Can I Improve My Skills In Soldering SMD Components?
Surface Mount Device (SMD) LEDs have become a popular choice in the electronics industry due to their compact size, efficiency, and versatility. Proper installation and soldering of SMD LEDs on a printed circuit board (PCB) are crucial for ensuring optimal performance and longevity. This article will guide you through the process of installing and soldering SMD LEDs effectively, while also addressing common challenges and best practices.

Understanding SMD LEDs
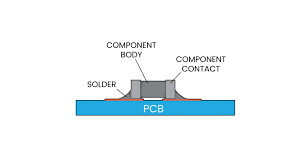
SMD LEDs are small, lightweight components that can be mounted directly onto the surface of PCBs. Unlike traditional through-hole LEDs, which require holes to be drilled in the PCB, SMD LEDs are soldered onto pads on the board's surface. This method allows for a more compact design and better thermal management.
Advantages of Using SMD LEDs
- Compact Size: SMD LEDs take up less space, allowing for more efficient use of PCB real estate.
- Higher Efficiency: They typically have better thermal performance, leading to improved energy efficiency.
- Versatility: Available in various colors and brightness levels, SMD LEDs can be used in a wide range of applications.
- Ease of Automation: SMD components can be easily handled by automated pick-and-place machines, speeding up production.
- Improved Light Distribution: The flat profile of SMD LEDs allows for better light distribution compared to traditional LED designs.
Preparing for Installation
Before you begin the installation process, it's essential to gather the necessary tools and materials. Here's what you'll need:
Tools Required
- Soldering Iron: A fine-tip soldering iron is ideal for precise work with SMD components.
- Solder: Use lead-free solder for a safer and more environmentally friendly option.
- Flux: Flux helps improve solder flow and adhesion.
- Tweezers: Fine-tipped tweezers are useful for handling small components.
- Magnifying Glass or Microscope: These tools help ensure accuracy during installation.
- Hot Air Rework Station (Optional): This can be beneficial for reworking or desoldering components without damaging the PCB.
Materials Needed
- PCB with Designated Pads for SMD LEDs: Ensure your PCB design includes appropriate pads for the specific SMD LED package you are using.
- SMD LEDs: Choose high-quality SMD LEDs that meet your project requirements.
Step-by-Step Installation Process
Follow these steps to properly install and solder SMD LEDs on your PCB:
1. Inspect the PCB
Before starting, inspect the PCB for any defects or contaminants. Ensure that the pads where the SMD LEDs will be placed are clean and free from oxidation or debris. A clean surface is crucial for effective soldering. If necessary, use isopropyl alcohol and a lint-free cloth to clean the pads thoroughly.
2. Apply Flux
Apply a small amount of flux to the pads where you will place the SMD LEDs. Flux improves solder flow and helps create a stronger bond between the LED and the PCB. It's important to use just enough flux; too much can create messiness and potential solder bridges later on.
3. Position the LED
Using tweezers, carefully position the SMD LED on the designated pads. Ensure that the polarity is correct; most SMD LEDs have a marking indicating the anode (positive) side. Align it precisely with the pads to avoid misalignment during soldering. Double-checking alignment at this stage can save time later by preventing rework.
4. Tack-Solder One Side
To secure the LED in place, heat your soldering iron and touch it to one side of the LED while simultaneously feeding a small amount of solder into the joint. This process is known as tack-soldering. It will hold the LED in place while you complete the other side.
5. Solder the Other Side
Once one side is secured, carefully solder the opposite side of the LED using your soldering iron. Ensure that you apply enough heat to allow the solder to flow properly but avoid overheating, which can damage the LED. A good practice is to keep your iron at around 350°C (662°F) for optimal results with lead-free solder.
6. Inspect Your Work
After soldering both sides, inspect your work under magnification to ensure that there are no cold joints or bridges between adjacent pads. A cold joint appears dull and may not provide a reliable connection. Look for shiny joints which indicate good connections; if any joints look suspect, consider reworking them by reapplying heat and adding more solder as needed.
7. Clean Up
Once satisfied with your soldering job, clean any excess flux from around the LED using isopropyl alcohol and a lint-free cloth or brush. This step helps prevent corrosion over time. Make sure not to leave any residue that could interfere with electrical connections or cause future failures.
Troubleshooting Common Issues
Even experienced technicians may encounter challenges when installing SMD LEDs. Here are some common issues and how to address them:
Cold Joints
Cold joints occur when insufficient heat is applied during soldering, resulting in weak connections. To fix this issue, reheat the joint while adding more solder if necessary. It's essential to ensure that both surfaces are adequately heated before applying new solder.

Misalignment
If an LED is misaligned after soldering, it may be challenging to correct without desoldering it first. Use a desoldering braid or pump to remove excess solder before repositioning it correctly. Take care when handling hot components; allow them to cool down before attempting adjustments if needed.
Overheating
Overheating can damage SMD components, leading to failure. Always monitor your soldering iron's temperature and avoid prolonged contact with any component. If you notice discoloration or burning smells during soldering, stop immediately as this indicates overheating.
Best Practices for Working with SMD LEDs
To ensure successful installation and longevity of your SMD LED projects, consider these best practices:
- Use Quality Components: Always choose high-quality SMD LEDs from reputable manufacturers to ensure reliability.
- Practice Good ESD Safety: Protect your components from electrostatic discharge (ESD) by using anti-static mats and wrist straps during handling.
- Keep Your Workspace Clean: A clutter-free workspace minimizes errors and improves efficiency during installation tasks.
- Follow Manufacturer Guidelines: Refer to datasheets for specific recommendations regarding temperature limits and mounting techniques for your chosen SMD LED model.
- Utilize Proper Lighting: Ensure your workspace is well-lit so you can see tiny details clearly when positioning components or inspecting joints.
Advanced Techniques for Professional Results
For those looking to enhance their skills further or achieve professional results when working with Surface Mount Device (SMD) LEDs, consider implementing these advanced techniques:
Using a Hot Air Rework Station
A hot air rework station can be invaluable when working with multiple SMD components or when needing to replace an existing component without damaging surrounding parts on a PCB. The hot air tool provides even heating across multiple pins simultaneously, allowing for easier removal or placement of components without direct contact from a soldering iron.
Preheating Your PCB
Preheating your PCB before soldering can help prevent thermal shock to sensitive components like SMD LEDs. Using a preheating plate set at around 100°C (212°F) can make it easier for solder to flow smoothly while reducing stress on components during assembly.
Using Automated Equipment
For high-volume production environments, consider investing in automated pick-and-place machines designed specifically for placing SMD components accurately onto PCBs quickly and efficiently. These machines significantly reduce labor costs while improving placement accuracy compared to manual methods.
Conclusion
Properly installing and soldering Surface Mount Device (SMD) LEDs on PCBs is essential for achieving optimal performance in electronic projects. By following best practices and understanding common challenges associated with these components, you can enhance your skills in working with advanced lighting technologies. With their compact size and efficiency, SMD LEDs can significantly improve your designs when installed correctly.
As technology continues to evolve, staying updated on new techniques and tools will further enhance your capabilities as an electronics technician or hobbyist working with Surface Mount Device (SMD) LEDs in various applications ranging from consumer electronics to automotive lighting solutions.

Related Questions
1. What Are Common Applications for SMD LEDs?
SMD LEDs are widely used in various applications such as backlighting displays, automotive lighting, consumer electronics, decorative lighting due to their compact size and versatility.
2. How Do You Choose Between Different Types of SMD LEDs?
When selecting an SMD LED, consider factors such as color temperature, brightness (measured in lumens), power consumption (watts), package size (e.g., 0603 or 0805), and intended application requirements.
3. What Is The Importance Of Polarity When Installing SMD LEDs?
Correct polarity is crucial because connecting an LED backward can prevent it from functioning properly or even damage it permanently due to reverse voltage exposure.
4. Can I Use Regular Leaded Solder For SMD Applications?
While you can use leaded solder for SMD applications, it's recommended to use lead-free solder for environmental compliance and safety reasons unless otherwise specified by project requirements.
5. How Can I Improve My Skills In Soldering SMD Components?
Improving your skills requires practice; consider starting with simpler projects before moving on to more complex designs involving multiple components or intricate layouts on PCBs.


